So, um… yeah. I took a really long vacation/retirement little break from the last time I posted. This has always been more of a hobby where I play with different platforms (currently Jekyll) and post things that I would like to refer back to later but I’ve misplaced my original notes. The fact that I use OneNote with OneDrive storage for my notes pretty much prevents me from losing anything now; hence, they latency in posting. Well, with Microsoft’s recent track record of outages across O365 as well as Azure, that may remain to be seen.

Anyway, I was recently in an environment where DHCP was run as a localized service in each physical location on a dedicated server. The sprawl that had crept in over the years made administration, backup, and recovery loads fun to the factor of suck. fun to the suck

So, the admins were in the process of collapsing these servers into two main DHCP servers located in two different datacenters which leverage MS DHCP replication/failover. This was working very nicely until we noticed that as the number of managed scopes increased, so did the time it took for the DHCP Admin snap-in to load. As there were going to be well over a thousand scopes when finished, adding a reservation was going to need it’s own budget code to charge time against while the MMC loaded.

To work around this, I leveraged the PowerShell DHCP Server cmdlets and wrapped a command-line-type menu around it for selecting tasks. As the cmdlets are only available when the RSAT DHCP Admin tools are installed, I leveraged remoting to eliminate the need for the RSAT tools very similarly to how the Exchange Admin tools work in PowerShell. Keep in mind that this was only written to wrap a few cmdlets into a simple command line menu for speeding up administration outside of the MMC. It can, however, be easily modified to add more functionality if desired. The usual “use at your own risk” and “I am not responsible if you blow up production” disclaimers apply.

DHCPUtility

I needed a way to backup some Route53 zones in an automated fashion. While there are some individuals who like to wrap this up in a CI/CD pipeline, that just adds complexity to a process that doesn’t need that much overhead. I’ll leave the Terraform/Jenkins/etc. and other, more complex infrastructure for another time that justifies the administration that comes along with the DevOps tools. Powershell it is then!

The script I configured will create subfolders on the local system where the scheduled task is run in the same directory as the script which will contain all the exported zones. They are currently using a date format to name the folders so if you plan on backing up more than once per day, you will want to modify the script to use a different naming convention so they don’t get overwritten on the same day. The local folders will be copied up to an S3 bucket as well. The script is currently configured to remove both local folders and files in S3 that are older than 60 days (again, modifiable). The script makes no changes to the Route53 zones; it is just an export process.

I also found a cool utility that makes the export process of the zones much easier. As an added bonus, it exports the zones in proper BIND format so if you ever needed to restore them (ugh!), they are already in a compatible import format for Route53. Cli53 is the tool I leverage in the script that does the “heavy lifting”. There is some pretty solid documentation, but you will want to be sure to set up your credentials as follows if you plan on running this as a scheduled task:

  1. Setup a profile for the AWS Credential using the Managing Profiles section of the Specifying Your AWS Credentials page. The Environmental Variable method to store credentials proved to be cumbersome in this automated scenario.
  2. Create a folder called .aws in the same folder where you keep the script and the Cli53 utility. You will need to use the command line (mkdir) as Windows does not allow you to create folders starting with a dot in the Explorer.
  3. Put the credentials file you create in the .aws folder.

You can grab the script here. Modify the variables in caps with underscores at the top to fit your environment. Put the script, the cli53 tool, and the .aws folder in the same directory. Finally, configure a schedule task to handle the automation schedule and let ‘er rip.

I didn’t have any SSO or SAML integration set up for this process so I had to apply an inline policy to the user account for access to the bucket. I used the following:

{
    "Version": "2012-10-17",
    "Statement": [
        {
            "Effect": "Allow",
            "Action": [
                "s3:PutObject",
                "s3:GetObject",
                "s3:DeleteObject"
            ],
            "Resource": "arn:aws:s3:::CHANGE_TO_BUCKET_NAME/*"
        },
        {
            "Effect": "Allow",
            "Action": "s3:ListBucket",
            "Resource": "arn:aws:s3:::CHANGE_TO_BUCKET_NAME"
        },
        {
            "Effect": "Allow",
            "Action": [
                "s3:ListAllMyBuckets",
                "s3:HeadBucket"
            ],
            "Resource": "*"
        }
    ]
}

I found this post while looking for different custom solutions to notify our end users of changes to the Citrix environment or outages related to published applications. As you can see from my simple, static blog while I definitely appreciate well designed web styles; I am not a huge fan of writing CSS and figuring out what works (or doesn’t) with different browsers, etc. Anyway, after downloading this tool and playing around with it I figured it would work for the team to leverage to easily publish notifications for the end users.

I liked the functionality but I wanted a self contained solution and a few more formatting options so I borrowed this idea and wrote this tool to encompass what was already done and add a little more. This also gave me an excuse to finally dip my toe into WPF. I did not modify much of the look/feel of the original as it works well. If it ain’t broke…

Modify receiver.html

Most everyone should already have it, but you will need at least .NET 4.5 Framework installed on the SF server(s).

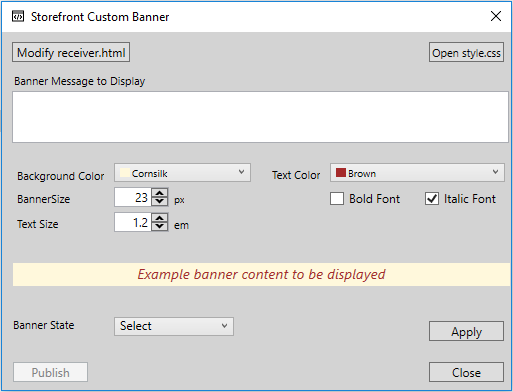
First thing to do is modify the receiver.html file. In the original post, this was done with a separate PowerShell script, but I added it to the tool. Click on the Modify receiver.html button and it will prompt you to select the target file (in case you have multiple stores), make a backup copy of the current one and make the following modification:

Replace

<div id=”pluginTop”><div id=”customTop”></div></div>

with the following

<div id=”pluginTop”><div id=”customTop”><div class=”StoreMarquee”><span></span></div></div></div>

If you have multiple Storefront servers, you will need to copy the updated file to each server or run the tool separately on each server.

Multiple Storefront Servers

If you want to publish the notification to multiple Storefront servers, you will need to create a Publish.txt file in the same directory as this utility. Enter the following path to each server as shown below; one server per line replacing [StoreName] with the actual name of your store:

\\server01.corp.net\C$\inetpub\wwwroot\Citrix\[StoreName]Web\custom\style.css

\\server02.corp.net\C$\inetpub\wwwroot\Citrix\[StoreName]Web\custom\style.css

\\server02.corp.net\C$\inetpub\wwwroot\Citrix\[StoreName]Web\custom\style.css

Using the tool

Once the preliminary stuff is done, simply launch the tool, open the style.css file using the button on top and set up your notification. Enter the message in the text window and modify the colors, font styles, and sizes using the controls. Set the Banner State to Enabled or Disabled and then click Apply. If you have multiple Storefront servers, click the Publish button to push it to the other servers. As shown below, the tool will also preview what the banner will look like before you publish it.

Note: If you have a long notification, you might find that the scrolling needs to be slowed down a bit. You can do this by manually modifying the following lines in the style.css file after you apply your changes and before you publish. Change the 30s to however many seconds works best.

animation: StoreMarquee 30s linear infinite;
-moz-animation: StoreMarquee 30s linear infinite;
-webkit-animation: StoreMarquee 30s linear infinite;

Storefront Custom Banner

Download the tool/source here.

In a recent redesign of a PKI infrastructure, I engaged Microsoft to help implement some best practices as the previous PKI design had been setup by the “guy who knows the most about certificates” about a decade ago.

As part of this process, the PFE stated that the use of the certsrv web page is being deprecated within Microsoft in favor of command line and MMC functionality. With that in mind, I made it a point to publish templates that were only absolutely necessary and focus on the site being an easy point to download the chain and CRL and that’s about it. It was funny how quickly I realized I used that webpage way more than I thought I did.

To keep me from having to constantly refer to Technet or keep using certreq /? all the time, I put together this quick PowerShell script to help automate the process. I also added a little Windows Forms integration so that I could allow some of the application teams to request their own certs instead of constantly requesting new ones for testing, etc.

This isn’t groundbreaking or anything and it isn’t the first script with this functionality, but it saves me a bit of time :).

#requires -Version 3.0

function Get-CertificateRequestFile {
  param (
    [string]$InitialDirectory = $PSScriptRoot
  )
  [System.Reflection.Assembly]::LoadWithPartialName("System.Windows.Forms") | Out-Null
  $ShowDialog = New-Object System.Windows.Forms.OpenFileDialog
  $ShowDialog.InitialDirectory = $InitialDirectory
  $ShowDialog.Filter = "CSR File (*.csr)|*.csr|Request File (*.req)|*.req|Text File (*.txt)|*.txt|All Files (*.*)|*.*"
  $ShowDialog.ShowDialog() | Out-Null
  return $ShowDialog.FileName
}


function Get-CertificateTemplates {
  $script:IssuingCA = certutil -config - -ping
  $script:IssuingCA = $script:IssuingCA | Where-Object { ($_ -match '\\') -and ($_ -notmatch 'Connecting')}
  $TemplateList = certutil -CATemplates -config $script:IssuingCA
  return $TemplateList
}

$script:IssuingCA = ""
$TemplateItems = @{}
$i = 0
$RequestFile = Get-CertificateRequestFile
$Templates = Get-CertificateTemplates

foreach ($Template in $Templates) {
  if ($Template.Contains("--")) { 
    $CurrentItem = $Template -split ' -- '
    $TemplateItems.Add($i,$CurrentItem[0])
    $i++
  }
} 
do { 
  Clear-Host
  Write-Output "`n"
  Write-Output "Selected Certificate Authority: $script:IssuingCA`n"
  $TemplateItems.GetEnumerator() | Sort-Object Name | ForEach-Object {Write-Output (" {0} - {1}" -F $_.Key, $_.Value)}
  $SelectedItem = Read-Host -Prompt "`nSelect the number for the requested template (CTRL+C to quit)"
  if ($SelectedItem -notin @(0..$i)) { 
    $CurrentUIColor = $Host.UI.RawUI.ForegroundColor
    $Host.UI.RawUI.ForegroundColor = 'Yellow'
    Write-Output "Please select a valid number or CTRL+C to quit.." 
    $Host.UI.RawUI.ForegroundColor = $CurrentUIColor
    Start-Sleep -Seconds 2
  }
} while ($SelectedItem -notin @(0..$i))

$results = $TemplateItems.GetEnumerator() | Where-Object { $_.Key -eq $SelectedItem}
$SelectedTemplate = ($($results.Value -split ':')[0]).Trim()

certreq -submit -config $script:IssuingCA -attrib "CertificateTemplate:$SelectedTemplate" $RequestFile

Clear-Variable TemplateItems

So you were probably redirected here and are wondering where is the tool?

While I did have something written in C#, it was kind of a pain to keep updating and seemed to have grown into something overly complicated. So… I decided to re-write it in Powershell. It is a side project but I should have something set to release before too long.

There are definitely other cool versions of something like this you can find, but they seemed to do one or two things and not everything. For example, it would clean excluded files but not excluded directories, or it would work with local UPM settings, but not really integrate with AD policies, etc. I want a tool that I can clean one or all profiles and clean files and directories that are excluded. Therefore, I cracked open ISE and off I went.

Sorry for the inconvenience; hope you find it worth the wait when ready.