I put these steps together using information and videos from this site http://blogs.technet.com/b/xdot509/.

  1. On the 2008 CA, create the following directory structure:

    a. C:\CABackupDatabase
    b. C:\CABackupConfig

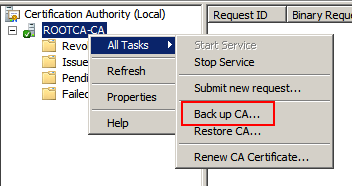
  2. Open the Certification Authority snap-in, right click on the CA name, and select Properties.
    alt text

  3. Click Next when the wizard launches.

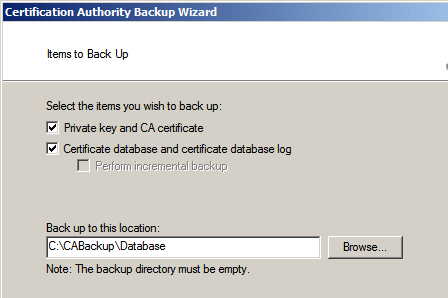
  4. At the next screen, check the boxes next to Private key and CA certificate and Certificate database and certificate database log. Select the C:\CABackupDatabase folder created in Step 1. Click Next.alt text

  5. Enter a password to secure the private key and CA certificate. Click Next.

  6. Verify that the certificate and database files were exported in the target directory.

  7. Export the **HKLMSYSTEMCurrentControlSetServicesCertSvcConfiguration** key to the *C:\\CABackupConfig* directory created in Step 1.
    ![alt text](https://www.afinn.net/images/ca_config_regkey-1.png "ca_config_regkey")

  8. Copy the C:\CABackup directory to the Windows 2012 server.

  9. I maintained the same servernames for my CA’s when I migrated so we’ll do the same here. Rename the Windows 2012 CA server to the same computer name as the 2008 root CA. As these are both offline and not joined to a domain, there shouldn’t be any naming collision in AD. If there is a static A record in DNS, that will need to be updated if the IP address is different.

  10. Add the **Active Directory Certificate Services **role to the Windows 2012 server.

  11. After restarting, finish the configuration of the ADCS.

  12. Select Certificate Authority, then Next.
    alt text

  13. Accept the default option for Standalone CA as the server is not domain joined and click

  14. Select Root CA as the CA Type and click Next.

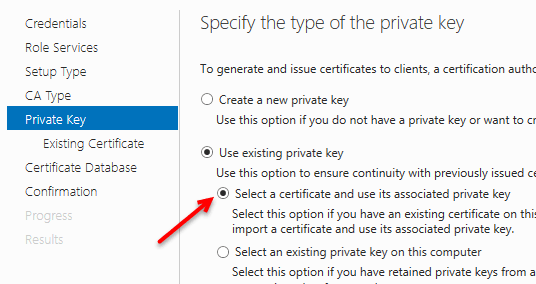
  15. At the Specify the type of the private key screen, select Use existing private key and the option Select a certificate and use its associated private key. Click Next.
    alt text

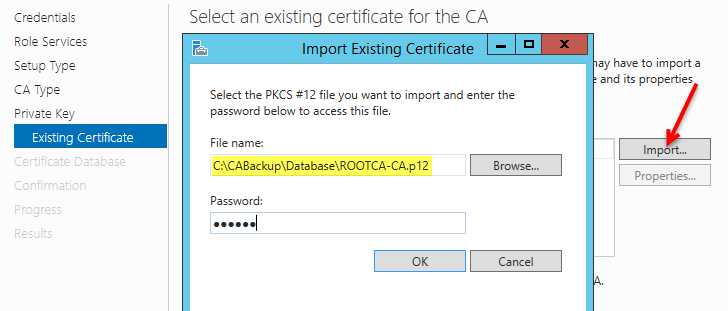
  16. Click the Import **button and browse to the pfx certificate backed up from the Windows 2008 root CA. Enter the password then click It will take a few seconds for the certificate to appear, when it does, select the certificate name and click **Next.
    alt text

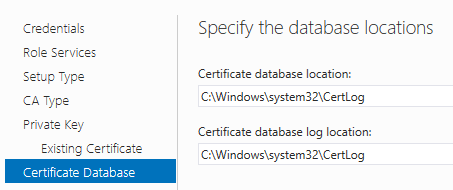
  17. Accept the defaults for the database and log locations or specify a different location. Click Next.
    alt text

  18. Verify the settings in the Confirmation page and click the Configure

  19. When the process completes, launch the **Certification Authority **mmc and verify the CA is visible and started.

  20. Right click on the name of the CA and select All Tasks/Restore CA.

  21. Click OK to stop the services.

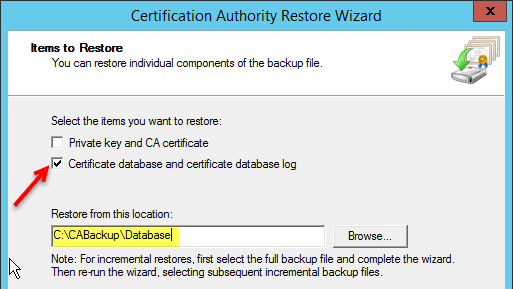
  22. When the wizard launches, select the checkbox next to Certificate database and certificate database log. Browse to the location of the database files backed up from the Windows 2008 Root CA. Click Next.
    alt text

  23. Click Finish to start the process.

  24. Select Yes to start the services when prompted.

  25. On the Windows 2012 root CA, export the same registry key from Step 7.

  26. Go the C:\CABackupConfig folder on the Windows 2012 root CA server, right click on the .reg file and select Merge.

  27. In the Certification Authority mmc, right click the server name and stop, then start the services one more time.

  28. This will create a new CRL which can be copied to the CRL Distribution Points.

  29. If any scripts were previously copied over, they may be restored now.

One of the items currently on my plate is to move the PKI infrastructure from the Windows 2008 Servers which were also upgraded from Windows 2003) to Windows 2012 servers. I plan to break this process down into the following steps:

  1. Remove stale requests and certificates and defrag/compact the databases on the Subordinate CA’s to remove the whitespace.
  2. Backup the offline Root CA certificate, keys, and database and restore to the Windows 2012 offline Root CA.
  3. Backup the certificates, keys, database, custom scripts on each of the Subordinate CA’s and then restore to the Windows 2012 Subordinate CA’s.

This post will cover the easy part which is preparing the cleaning up and shrinking the databases. Since I have to do this more than once and will need to occasionally perform ongoing cleanup maintenance on the databases at later dates, I put the process into a simple batch file shown below. I added a lot of inline documentation because this isn’t something that is done very often and I don’t want to keep pulling up old articles and documentation explaining what I did the last time, plus I plan on handing this off to someone else for maintenance once the migration is completed so the script documentation will help that individual(s) as well.

As a side note, the certutil -deleterow process will appear to throw errors in the exit codes after it displays how may rows were affected (deleted). This is expected as there is a limitation on how many records the utility can delete at one time and if you have more records to delete than the limitation, the process triggers an error. The script below uses a loop to cycle through the process until all the specified records have been removed at which time it will complete with an exit code of 0 (zero).

@echo off
SETLOCAL ENABLEEXTENSIONS

:: *** SET THE TARGET DATE ***
REM Change the following date to reflect the date from which all prior
REM records will be removed. For example: 1/15/2014 will remove all records
REM BEFORE 1/15/2014.
SET targetdate=12/31/2014

:: *** SET THE RECORD TYPE ***
REM Change the following to reflect the type of record to be deleted.
REM I have only tested with Request and Cert but the following are available:
REM (returned from certutil -deleterow -?
REM Request - Failed and pending requests (submission date)
REM Cert    - Expired and revoked certificates (expiration date)
REM Ext     - Extension table
REM Attrib  - Attribute table
REM CRL     - CRL table (expiration date)
SET requesttype=cert

:: *** SPECIFY BACKUP OPTION ***
REM Set the following variable to "true" (no quotes) to enable backups.
SET performbackup=false

:: *** SPECIFY BACKUP TARGET LOCATION ***
REM Specify the directory path where the backup will be stored.
REM If the performbackup variable is false, this value has no effect.
SET backuploc=C:CertDBBackupDir

:: *** SPECIFY DEFRAGMENTATION OF DATABASE ***
REM Set the following variable to "true" (no quotes) to compact the database.
REM NOTE - The certificate services will be stopped for this process as the
REM CA cannot be online during compaction.
SET performdefrag=false

:: *** SPECIFY TEMP DATABASE LOCATION ***
REM Specify the directory path where current CA database is located.
REM When the process completes, the current (fragmented) database
REM will be copied to a new location and renamed with a random name.
REM If the performdefrag variable is false, this value has no effect.
SET currentdb=C:PathToCurrentCA_Database.edb

REM The certutil.exe utility has a set number of records it can delete at
REM a given time and will stop when that value is reached. To keep the
REM process continuing until all specified records are removed, we
REM implement a loop. Depending on how many records will be deleted, this
REM process can take a LONG time to complete.
:TOP
certutil -deleterow %targetdate% %requesttype%
if %ERRORLEVEL% EQU -939523027 goto TOP

REM Perform backup if specified earlier in the script.
IF "%performbackup%"=="true" (
	start /wait certutil -backupDB %backuploc%
)

REM Perform database compaction if specified earlier in the script.
IF "%performdefrag%"=="true" (
	net stop CertSvc
	start /wait esentutl /d %currentdb% > results.log
        net start CertSvc
)

ECHO.
ECHO Process has completed. If database compaction was selected,
ECHO you must copy the database from the temporary location back 
ECHO to the original database location and rename it to match the
ECHO original database file name. When completed, restart the 
ECHO Certificate Services service.
ECHO .

If you manage SCOM, you are all too familiar with the lack of functionality to easily schedule maintenance mode with a future start time. While there are several good PowerShell scripts available a-la Google to facilitate some semblance of scheduling, I’ve always wondered why MS did not include this functionality into the base product. As many SCOM admins know, the platform can get fairly complex pretty quickly as management packs are added, written, customized, etc. This complexity makes customizing a scheduling tool for maintenance even more fun when we start to step outside the good old Microsoft.Windows.Computer class.

Veeam has a pretty slick management pack to monitor both VMWare and Hyper-V within SCOM. I work in mainly a VMWare shop so I’ll focus on that. While this integration is super cool when we go to set up alerting, dive into the dashboards, and run the reports, it adds an additional layer to contend with if we want to schedule maintenance. This main hurdle to overcome is that while putting the ESX host into MM via the VMWare class takes care of the VM’s from Veeam’s perspective, these VM’s may also be running a Windows Agent which is NOT sub-classed within the Veeam.Virt.Extensions.VMware class. If you do not use the Windows Agents in favor of the monitoring solely through Veeam, then you don’t have anything to worry about; however, if you do still leverage the Windows Agent, then you have an additional class to worry about with maintenance mode. What? You also run Linux VM’s??? Oh, dear!

I was actually thinking closer to “Oh, s**t!” when I starting trying to bend some scripts around the maintenance scheduling because you do need to consider all possible VM OS types. As I needed to provide a way for application teams to put their own servers into maintenance, PowerShell scripts didn’t really work since not everyone working on the application is a PS wizard so I created a web application that allows them to manage their maintenance mode. The backend is C Sharp and although I did something similar several years ago in SCOM 2007, I found that 2012 was a bit easier as we don’t have to explicitly contend with the Health Watcher and can simply work with the MonitoringObject class for maintenance methods. The following function demonstrates placing not only the ESX host in MM via Veeam, but also demonstrates recursively enumerating the PMO.GetRelatedMonitoringObjects and placing them into MM via the MonitoringObject class.

public static void GetVMListForMM(string targetName, DateTime dtmNow, DateTime dtmTimeWindow, MaintenanceModeReason reason, string scheduledComment)
        {
            try
            {
                Microsoft.EnterpriseManagement.ManagementGroup managementGroup = new Microsoft.EnterpriseManagement.ManagementGroup(ConfigurationManager.AppSettings["ManagementServer"]);
                ManagementPackClassCriteria criteria = new ManagementPackClassCriteria("Name = 'Veeam.Virt.Extensions.VMware.VMHOST'");
                IList<ManagementPackClass> classes = managementGroup.EntityTypes.GetClasses(criteria);
                List<MonitoringObject> list = new List<MonitoringObject>();
                List<PartialMonitoringObject> monitoringObjects = new List<PartialMonitoringObject>();
                List<string> duplicatelist = new List<string>();
                IObjectReader<MonitoringObject> objectReader = managementGroup.EntityObjects.GetObjectReader<MonitoringObject>(classes[0], ObjectQueryOptions.Default);
                list.AddRange((IEnumerable<MonitoringObject>)objectReader);
                foreach (PartialMonitoringObject monitoringObject in list)
                {
                    if (monitoringObject.DisplayName.ToLower() == targetName.ToLower())
                    {
                        foreach (MonitoringObject relatedVMObject in monitoringObject.GetRelatedMonitoringObjects(TraversalDepth.Recursive))
                        {
                            if (relatedVMObject.ToString().Contains("VM"))
                            {
                                foreach (MonitoringObject monitoredVM in relatedVMObject.GetRelatedMonitoringObjects(TraversalDepth.Recursive))
                                {
                                    string strmonitoredVM = monitoredVM.DisplayName.ToLower();
                                    if (strmonitoredVM.Contains("domain.local") == false)
                                    {
                                        strmonitoredVM = strmonitoredVM + ".domain.local";
                                        duplicatelist.Add(strmonitoredVM);
                                    }
                                    else
                                    {
                                        duplicatelist.Add(strmonitoredVM);
                                    }
                                }
                                List<string> uniquelist = duplicatelist.Distinct().ToList();                                
                                foreach (string strmonitoredVM in uniquelist)
                                {                                    
                                    IObjectReader<MonitoringObject> readerMonitoredVM = managementGroup.EntityObjects.GetObjectReader<MonitoringObject>(new MonitoringObjectGenericCriteria("Name='" + strmonitoredVM + "'"), ObjectQueryOptions.Default);
                                     monitoringObjects.AddRange(readerMonitoredVM);
                                    foreach(MonitoringObject mo in monitoringObjects.Distinct().ToList())
                                    {
                                        if (!mo.InMaintenanceMode)
                                        {
                                            if (!mo.FullName.ToLower().Contains("dhcp")) //Found this was needed to handle objects discovered by the DHCP management pack.
                                            {
                                                mo.ScheduleMaintenanceMode(dtmNow, dtmTimeWindow, reason, scheduledComment,TraversalDepth.Recursive);
                                            }
                                        }
                                    }
                                    monitoringObjects.Clear();
                                }
                            }
                        }
                    }
                }
            }
            catch (Exception ex)
            {
                // Handle or log exception
            }
            finally
            {
                // Code to wrap it up
            }
        }

Slap a few more methods in there to handle other objects like groups or explicit OS classes directly and pop a little web front end on it and you have a self-service application that allows the different application teams to directly place their servers into maintenance mode without granting access to the SCOM console or requiring them to RDP to a server to run a PowerShell script to schedule a task.

Adding SNMP monitoring for network devices in SCOM 2012 has improved substantially over previous versions. SNMP monitoring is great for basic alerting (up/down) and obviously our performance data will come from SNMP; however, to get fairly granular alerting on most network devices we need to leverage syslog. The documentation on this is fairly light and a little inconsistent so I thought I’d post what works for me.

The first step is to get your devices discovered via SNMP. There are several excellent articles on this as follows so I will not reinvent the wheel here. How to Discover Network Devices in Operations Manager SNMP Trap monitoring with SCOM 2012 R2

Create the Groups It is a good idea to create a new management pack to contain the groups and the rules used in syslog monitoring. It simplifies targeting for overrides without getting into additional details of visibility limitations due to sealed and unsealed management packs. Once you have your devices discovered, the next step is to create groups containing similar devices that will share similar syslog events you want to target. For example, you might want to create a group to contain your routers, another for your edge switches, another for your core switches, another for your VoIP telephony, etc. Populate the groups accordingly with the network devices. When you target the members (either via the Explicit Members or the Dynamic Member tabs) you will want to target objects of type Node (System.NetworkManagement.Node). I would add that you will need a pretty solid IP scheme standard in place (e.g. 1-5 in last octet reserved for routers, 6-15 in last octet reserved for switches, etc.) in your environment to leverage the Dynamic Members tab effectively. If you do, this site has helped me quite a bit with the joy that is regex for ip addresses: Working with regular expressions and ip addresses in OpsMgr 2012. Edit (08.23.2015 - I also bit the bullet and posted some details regarding SCOM and regular expressions in a bit more detail that might help at Using Regular Expressions with SCOM 2012 Groups).

Create the Alerts After you have set up your group(s), you are ready to move on to creating the rules that will alert on the syslog messages. Alerts are categorized from the different system components through defined Facility names listed below. Full parameter list is referenced at IANA here.

Numerical Code Facility
0 kernel messages
1 user-level messages
2 mail system
3 system daemons
4 security/authorization messages
5 messages generated internally by syslogd
6 line printer subsystem
7 network news subsystem
8 UUCP subsystem
9 clock daemon
10 security/authorization messages
11 FTP daemon
12 NTP subsystem
13 log audit
14 log alert
15 clock daemon
16 local use 0 (local0)
17 local use 1 (local1)
18 local use 2 (local2)
19 local use 3 (local3)
20 local use 4 (local4)
21 local use 5 (local5)
22 local use 6 (local6)
23 local use 7 (local7)

Syslog also assigns a criticality to the alert in addition to the location it originates in the system/subsystem. This parameter is known as the Severity of the syslog notification. A table representation of the Severity levels is as follows (referenced from https://en.wikipedia.org/wiki/Syslog#Severity_levels):

Value Severity Keyword Description/Examples
0 Emergency emerg Multiple apps/servers/sites. This level should not be used by applications.
1 Alert alert Should be corrected immediately, An example might be the loss of the primary ISP connection.
2 Critical crit May be used to indicate a failure in the system’s primary application.
3 Error err An application has exceeded it file storage limit and attempts to write are failing.
4 Warning warning May indicate that an error will occur if action is not taken, For example a non-root file system has only 2GB remaining .
5 Notice notice Events that are unusual but not error conditions .
6 Informational info Normal operational messages -no action required. Example an application has started, paused or ended successfully.
7 Debugging debug Info useful to developers for debugging the application.

A good example for a first rule would be alerting on all Severity 0 events.

  1. In the Authoring pane of the Operations Manager console, right click on Rules and create a new Rule.

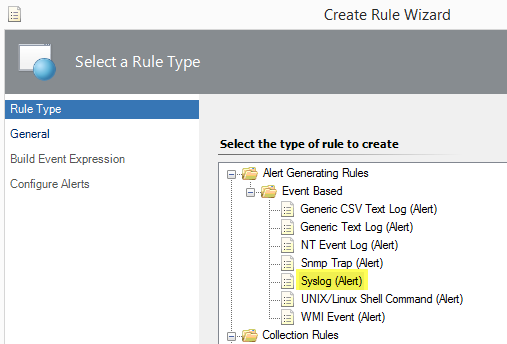
  2. Select the Syslog (Alert) rule under Event Based. alt text
  3. Give the rule a name and select the group created earlier. This group should contain objects of the Node class. Be sure to uncheck the Rule is enabled checkbox. These rules should all be created as disabled; they will be enabled via overrides later. alt text

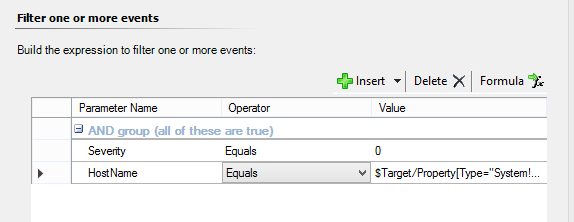
  4. To configure the filter two parameters need to be defined: Severity and HostName. The severity is self explanatory. The HostName will be critical to prevent the alert from triggering once for each device in the group. As this rule is targeting Severity 0 (zero) events, set the first parameter to Severity Equals 0. Insert an additional parameter and set it to HostName Equals $Target/Property[Type="System!System.Entity"]/DisplayName$. This will ensure the alert only fires once for each device it matches instead of all group members. This is different from Alert Suppression.alt text
  5. Finally, you want to add a little more description to the alert notification. I find the following is a fairly descriptive summary:
Description: $Data[Default='']/EventDescription$
Facility: $Data/EventData/DataItem/Facility$
Severity: $Data/EventData/DataItem/Severity$
Priority: $Data/EventData/DataItem/Priority$
Priority Name: $Data/EventData/DataItem/PriorityName$
Time Stamp: $Data/EventData/DataItem/TimeStamp$
Host Name: $Data/EventData/DataItem/HostName$
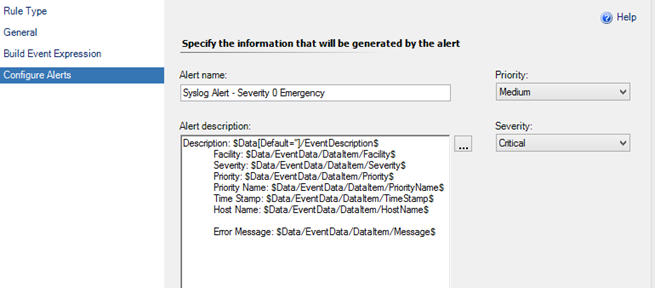

alt text

  1. Go back into the properties of the rule and select the Configuration tab.
  2. Select the Edit button under Responses at the bottom.
  3. Click the Alert Suppression button.
  4. Select the following checkboxes to prevents duplicate alerts: Event Source, Logging Computer, **and **Event Level. Save the changes.
  5. The final step is to Override the alert for the target group(s) you want the alert to be functional and set the override to Enable.alt text

Another option with more flexibility is to use the Message parameter in Step 4. This allows for the use of regular expression matching on the description string. For example, let’s say you want to be alerted if a switch detects a duplicate IP or MAC address on the network. This can be done with a single parameter line as follows:

Message           Matches regular expression                 duplicate.*address

Where “Message” is the Parameter Name; “Matches regular expression” is the Operator; and “duplicate.*address” is the Value. In “duplicate.*address”; the “dot” means to match any character and the “asterisk” means to match any number of times. Therefore, this would match both “duplicate ip address” as well as “duplicate mac address” using SCOM Regular Expression Support.

This method worked for me because I had hundreds of network devices across multiple subnets and this approach allowed me to group the similar devices together and then target all the custom rules I created to the groups where they were applicable based upon the message. This might also be approached from a completely different angle where the rules targeted the server objects receiving the syslog alerts themselves (agents or management servers) instead of Node objects although that might not scale for large environments. Either way, this was mainly a way for me to document what I did for later reference. I hope it may have saved you some time in your configuration.